Monday, March 24, 2014

Warmachine Battle Report: The Harbinger of Menoth vs. General Ossrum


A grind fest of a TempleCon game, but one of the ones I enjoyed the most. My opponent was playing a beautifully painted set of Mercs headed up by Ossrum and anchored by an Earthbreaker. This was my first time seeing an Earthbreaker across the table. I enjoyed listening to a recent podcast starring the colossal, but my secret fear was that it would give me nightmares like the OTHER. That is actual, for real, nightmares. I have had several starring Mercenary Colossals … they aren't great (the nightmares).


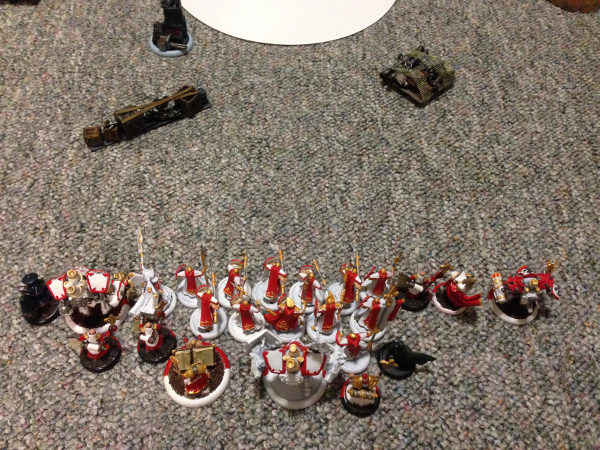
Here is what the Earthbreaker looked like:


I ran a Harbinger list I enjoy. I call it “Wristcutters, A Love Story”:
Harbinger
- Hierophant
- Vanquisher
Avatar of Menoth
High Paladin Dartan Vilmon
Paladin of the Order of the Wall
Eiryss, Angel of Retribution
Covenant of Menoth
Vassal of Menoth
Wrack
Exemplar Bastion Seneschal
Exemplar Bastions
Exemplar Bastions
Choir of Menoth (min)


I don't recall everything my opponent ran, but I will try to piece it together from a few scattered notes and some pictures. It was Ossrum, an Earthbreaker, Forgeguard (Hammer Dwarves), a cluster of spell casting guys, a jack I referred to in my notes as a “Bunny Jack”, and a couple other solos.


The match was on an open table, we rolled up a scenario and settled on Outflank. I have a special place in my heart for Outflank. It was the first scenario I ever played. And the first few times I played it, I did so badly. My strategy now is to jam up the center and disperse left and right, which seems to work well with my Menoth lists.


Harbinger wins initiative and elects to go first.
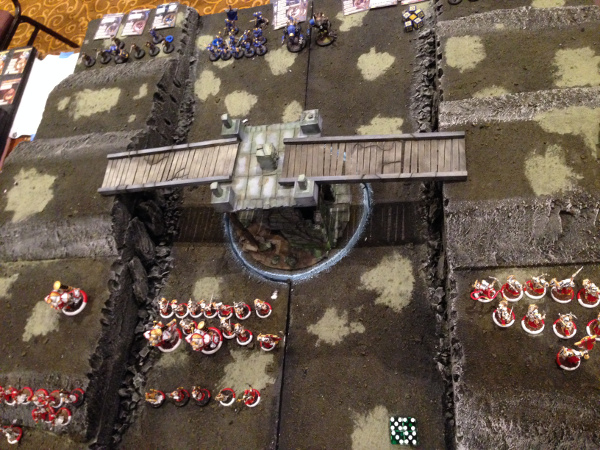


DEPLOYMENT


A well painted colossal is an intimidating thing to see across the table. A good model makes it even worse. Plus, the rest of his army was gorgeous in purple. He chose to deploy right of his center. There was a pile of rocks causing a bit of an issue on his center line.


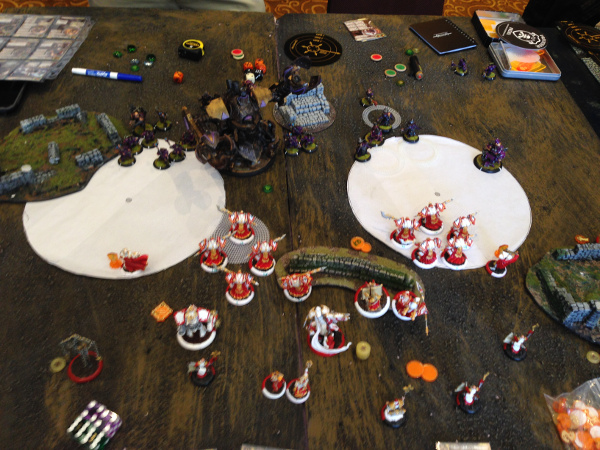
Harbinger deployed centrally with a unit of Bastions on each side. The Avatar anchored the right flank and the Vanquisher anchored the left. The Book and the Seneschal joined Harbinger in the center and the Choir was stretched to the breaking point. A paladin took the left flank and Vilmon took the right. Eiryss deployed far right.


TURN 1: MENOTH


One of the largest challenges in this list is getting to the party. Bastions are slow and Harbinger does not do much to alleviate that problem. Yes, she can give them Crusader's Call and they can fail charges for 9” (one inch beyond their normal run), this also has the effect of taking them out of Martyrdom range … not that I am martyring Bastions at the bottom of 1, but I have been rocked by opponent's before and am wary. The Bastions settle in for a run to start getting them forward. The Choir sings Passage because there are guns on the other side of the table, but little to no magical weapons. This is one of those times when playing outside of your meta is a relief. The Avatar raises Gaze and runs. I like to raise Gaze even though I know it will not come into play. I have the focus to burn and I practice doing it enough that I am not likely to forget if my brain starts slipping (such as it tend to do after playing game after game for four days straight).


Since there is a dearth of magical weapons across the table, the Paladin and Vilmon advance and establish their Impervious Wall. The Book advances and bolsters everyone with No Knockdown/Stationary. Harbinger tucks forward eyeing the wall. The Vanquisher runs forward. It is going to be responsible for the left zone and the Avatar is going to anchor the right zone. The Bastions are going to split duty, all subject to change based on my opponent.


TURN 1: MERCS


The Mercs run forward, trying to cover as much ground as possible before Harbinger feats. The Colossal launches shots at the Bastions and manages to cover one of the units with rough terrain … that's not great. That is actually the worst thing ever. A Vassal takes some splash damage for two. The Bastions are only scratched a little, and the Seneschal will be able to patch them up. The Forgeguard (looks like Hammer Dwarves in the picture – so pretty – such a pita) move forward in their classic triangle formation. Some of the Merc forces head for the Avatar's zone, including a warjack. The threat range dance is about to begin.


TURN 2: MENOTH


The Harbinger has seen the range of the Earthbreaker and is less inclined to reach the wall. There is no Devout in this list, so she has to be more careful about getting shot. She also needs to keep Vilmon and the Paladin at the edges of her command range for martyring in case the Mercs can cough up some Magic. The Vanquisher gets a few focus and Harbinger camps the remainder. I screw up my order of activation a little here because the Vanquish activates and fires. It also gets an Ancillary from the Vassal. Between the two shots, two Dwarves dies and several are lit on fire. Unfortunately, Harbinger clears off the fire when she casts Purification. She advances to the point where she can hit a maximum range martyrdom on both the left and right zones and feats.


The Paladin advances into the left zone and again uses Impervious Wall. That Paladin no longer has any function but to double sac and stand in the zone like a jerk. Vilmon does the exact same thing to the right zone, effectively denying the possibility of a scenario win to my opponent. The Bastions on the right flank run into the zone in a group, putting pressure on the right side. The Bastions on the left flank sloooooowly crawl out of the rough terrain (Saxon, oh Saxon, wherefore art thou, Saxon?) and prepare to get bogged down again.


The Book advances to the wall … it loves having any sort of cover, and proclaims no knockdown. The Seneschal parks right beside the book. The Choir again signs the Hymn of Passage trying to deny my opponent as many vectors of attack as possible. The Avatar runs to the edge of the right zone. Eiryss advances to the edge of the terrain on the right. A piece of her base is just visible in the picture.


TURN 2: MERCS


Not much movement under feat, however, the bunny jack on the right flank slams the Avatar 7 inches backwards into Eiryss, killing her in a sticky pile of gore and knocking the Avatar down. A few more shots in on the bastions with the Earth colossal


Under Harbinger's feat, my opponent does not plan on accomplishing much beyond range shots. However … the bunny jack on the Avatar's side concocts a cruel plan. As if my opponent plays a lot of pool, he lines up a slam that perfect launches the Avatar back 7 inches directly into Eiryss. Eiryss is squashed like a bug on a windshield. It's gruesome. Definitely a sticky pile of goo. And, of course, the Avatar is knocked down because it is very far away from the Book. The Earthbreaker continues to try to dump shots into the Bastions, but barely scratches them. Sanguine Bond is distributing everything around, and they have forty boxes as a unit. It does manage to drop even more rough terrain, however.


Harbinger's feat turn has done what it is supposed to do … the Bastion's will get another turn of movement to gain the center of the board. My opponent passes turn with both zones contented by both armies.


TURN 3: MENOTH


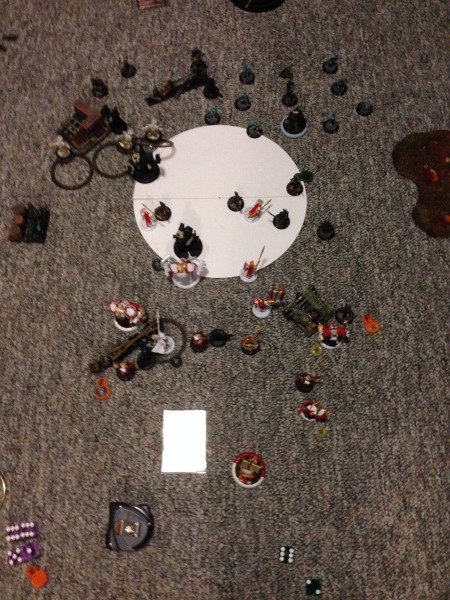
And this is where my brief notes after the match run out. I played 18 games at TempleCon. I took pictures for all of them. I remember three very clearly. Let's see if pictures can be turned into words.


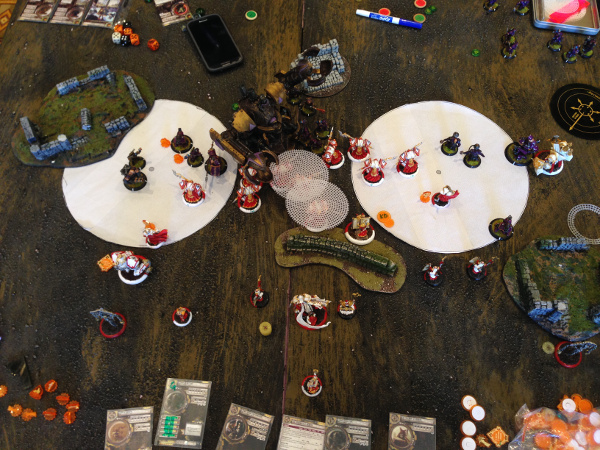
The Avatar gets several focus and shakes off knockdown and bits of bone and blood from the late Eiryss. Harbinger allocates a focus to the Vanquisher and camps a pile. The Choir activates and advance as best they can. The Vanquisher is in range for Passage, but the Avatar is not. One of the boys toes into the zone because why not. The Vanquisher pumps a shot into the support ranks at the edge of the left zone and manages to light several things on fire. The Paladin double sacs and goes to 21 Arm and Impervious Wall. Vilmon, on the other side is concerned about getting slammed around so he advances into the zone and raises Impervious Wall. The Harbinger activates and pulls one off the wrack. The only way the Bastions are ever going to get to the show is if she helps them. Fortunately she has a ready-made tool for the occasion. Crusader's Call to the rescue. It's time for the Bastions to start working on the Earthbreaker. The left flank Bastions charge/run and a few stick the landing. The right flank Bastions charge/run and spread out. One lucky Bastion sticks the charge and the rest attempt to foil access to the support staff. With scenario on lock-down, the main concern is to clear off the most threatening pieces (#1 – the Earthbreaker) and to protect that back ranks. The Avatar raises gaze and charges the bunny jack. The Book advances and calls for No Knockdown. The rest of the Bastions need to make it to the show and spending another turn stumbling and bumbling will put a damper in that.


TURN 3: MERCS


Fire delivers some pain and more of the Merc support staff falls. The Earthbreaker smashes and bashes on the Bastions, but at the end of the day only one of the falls. The bunny jack tries to scratch the Avatar. The Book allowing spells means that some of the Mercs can sneak into the zone and try to blast Vilmon with spells. He lives, barely, and Menoth sets its sites on the next threat to the scenario lock down. The remains of the hammer dwarves try to smack some Bastions around, but come up short. The Mercs are having a hard time cracking through Sanguine Bond, although the Seneschal does start to come under fire. Fortunately he is protected by the Harbinger.


TURN 4: MENOTH


The Harbinger allocates to the Vanquisher and the Avatar gets a full load of focus. The Vanquisher lobs more fire without much effect. Bastions go to work on the Earthbreaker and also sink a few charges into the back ranks of support. A pair of Bastions murder the spell casters who attacked Vilmon. The Earthbreaker manages to live through the attention of the Bastions, requiring the Seneschal to finish the deed. The Paladin advances to tie up the enemy guns in the center of the zone. The Avatar smites the bunny jack into pieces. Vilmon turns around and walks over to the other caster in the zone and puts him down. The Book switches back to no spells, because the enemy caster is close. At this point the Merc army has a few dwarves and some support remaining. The armies of Menoth have lost one Bastion and a Wrack. The right zone is clear, and Menoth scores the first control point.


SCORE: MENOTH 1, MERCS 0


TURN 4: MERCS


With the Book in shutdown mode and protected by Harbinger, there isn't much that can be done on the spell casting side of things. The Bastions are smashed around some, and are starting to creek, but they still have boxes to spare. The Paladin gets slammed backwards but lives. Something deviates into the choir boy near the Vanquisher, wiping him out. The Mercs are unable to contest the right zone again. Nothing but the lone choir boy dies on the Menoth side of things and Menoth scores another control point.


SCORE: MENOTH 2, MERCS 0


TURN 5: MENOTH


The Harbinger allocates focus to the Vanquisher. The Choir leader advances and sings Battle. The Vanquisher charges into the zone and threshers. The Paladin charges an enemy and puts it into the dirt. The Bastions clear the remaining enemies out of the left zone and dirt nap most of the rest of the Mercs. Harbinger activates and runs into the right zone. Menoth controls the left and dominates the right for three points and the victory.


SCORE: MENOTH 5, MERCS 0


VICTORY FOR MENOTH!!


Thoughts on the battle:
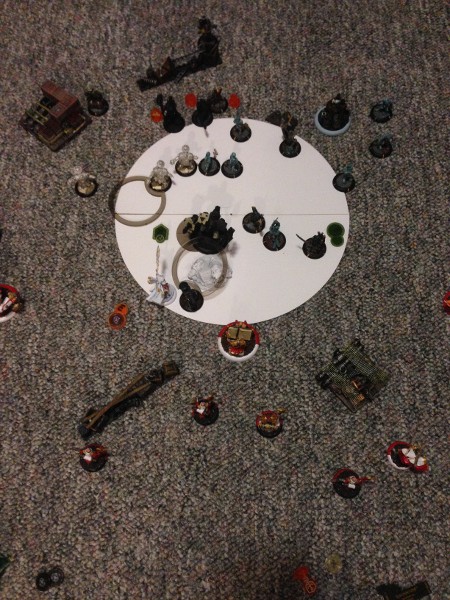
This was a fun one. Both armies were fully painted and it looked stellar. This was the first time I had faced an Earthbreaker, and I was nervous. Once I realized that my opponent had very few outs against double sacc'd Paladins, I knew I could take my time with the game because I was dictating the scenario. I set myself up for the slam that killed Eiryss and I need to be better about seeing that sort of thing in the future. Harbinger plus the 19 point Bastion package is still one of my favorite things in the faction. Unless I am facing something like Banes or Satyxis Raiders, it takes a ton of energy to chew through them. My opponent was never able to sink a ton of damage into them, and as a result both units remained mostly intact the entire battle. You can see in the final picture that the gold trim unit still had a few boxes to spare. I lost three models the entire time, a Bastion who got Earthbroken and a Wrack that exploded as they do, and an unlucky choir boy. Outflank remains one of my favorite scenarios.


Thanks for reading.


Sunday, March 23, 2014

Warmachine Battle Report: Vice Scrutator Vindictus vs. Commander Coleman Stryker


The Iron Arena at TempleCon 2014 had a wonderful assortment of tables. Some of them were built for interesting situations and some were a bit lop-sided. Part of the challenge in the assessing an interesting table is to figure out how to avoid a potential lop-sided nature. The ruined guard tower table was definitely interesting and absolutely gorgeous. On each flank was a steadily climbing hill building up the ravine running through the middle. At the summit was a pair of bridges leading to the remains of a ruined tower. In the ravine below, a glowing circle described the base of the tower's remains and within those ruins lay a terrifying force. It was this eldritch landscape where the forces of Cygnar and Menoth met to do battle and contest control of the ruined tower.

At my opponent's command was the Cygnar Warcaster Stryker, several units of long gunners, mighty Stormblades, and several Warjacks. The forces of Menoth were led by Vice Scrutator Vindictus and his Missionaries of War. They included two full units of Exemplar Errants, each with their own Officer and Standard Bearer. An Exemplar Errant Seneschal supported the right flank of Errants. A unit of Holy Zealots accompanied by the Monolith Bearer surrounded the Warcaster. A Reclaimer watched over the souls of the chosen. And at the Vice Scrutator's command were three massive Reckoner Warjacks looked over by the holy Choir of Menoth.

DEPLOYMENT

When the two armies came within view of each other, the Cygnar force was deployed with a unit of gunners at the base of each hill, the Stormblades on Striker's right and the Warjacks in the center. The Menoth forces arrayed a unit of Errants with the Seneschal on the right flank. The Zealots commanded the left flank and anchored with one Reckoner. In the ravine, on the left flank, Vindictus screened himself with two Reckoners and a unit of Errants.


TURN 1: CYGNAR

The Stormblades advanced and the Cygnar Warjacks ran up the middle of the ravine. Stryker placed defensive buffs on the Gunners he could reach, arcane shield on the stormblades and advanced. The long gunners were blocked from drawing a line of fire past the center point of the hill. They advanced and Cygnar passed the turn.


TURN 1: MENOTH

Vindictus realized his best chance at ruining Stryker's day was to move aggressively forward and attempt to take control of the ruined tower as quickly as possible. The geography of the sides of the ravine are going to work to his advantage because they are going to eliminate the biggest advance of the Cygnar forces: ranged guns. The sides of the hill rise to such a height that falling from them would be very bad for the health of anything except a Zealot caught in the fervor of his faith.

At the base of the ravine, Vindictus calls on a nearby Zealot to die for the cause, and Sacrifices his soul to power the Reckoners. He casts True Path to give everyone near him extra legs to swarm the center of the field. The he advances to the back of his screening unit and calls upon his Feat to exact Penitence from the enemy's of Menoth.

The Choir sings a hymn to each Reckoner granting it Passage against non-magical ranged attacks. The Reckoner on the left flank runs forward to the summit, The Zealots chant a prayer against spells and run to join the Reckoner. Seeing a fearsome Menoth Warjack crest over the hill behind a screaming horde of Zealots must have sent chills down the spines of the Cygnar gunners waiting below.

On the right flank the Errants run forward and spread out, The Seneschal dashes along the edge of the ravine, angling towards the bridge. His holy mission is to survive long enough to reach the top of the haunted tower. His loyal Errants will buy him the time he needs with their lives, if need be.

Down in the ravine, the Errants around Vindictus advance to the center of the field and a few take snapshots at the opposing Stormblades. The Arcane Shield around the Stormblades fails against the Blessed crossbows of the Menite Exemplars and several perish. The Reckoners lumber along behind the Errants, threatening doom to anything they might reach.


TURN 2: CYGNAR

On the Cygnar left flank, the gunners advance and try to clear out the Errants. Despite multiple shots from each, the front line holds fast, although some loyal souls sacrifice themselves out of the back ranks. The Seneschal remains unharmed. On the other flank, the gunners advance and lay down a covering fire of bullets, determined to hold back the inevitable zealot advance and Reckoner charge. Below, the Stormblades attempt to kill Errants, but once the threat of Penitence sinks in, their aggression ceases. Striker and his Warjacks advance diagonally across the field. The haunting force within the ruins will hurl any Warjack out of the circle and Cygnar elects not to enter it.


TURN 2: MENOTH

Vindictus has a commanding position on the field and the forces of Cygnar have fallen prey to their cautious instincts. The ruined tower is tall. It is so tall that the top of the tower is a completely different zone from the base. Vindictus grins in triumph and advances into the circle. On the right flank, the Seneschal runs forward and across the bridge, crossing into the top circle. The forces of Menoth dominate the ruined tower base and control the top for three control points and victory. (The picture below was taken at the end of the last turn.)

SCORE: MENOTH 3, CYGNAR 0


VICTORY FOR MENOTH!

Thoughts on the battle: Ok, the scenario was only to three points. The game was over fast enough that I felt like trying a little storytime version of the battle report. After playing the scenario, if I saw anyone on the table, I recommended that they play to five. I am not sure why my opponent didn't contest the zone with something. His caster could not do it and his Warjack would get hurled out. I believe you had to pass a terror check to stay in the circle so there is a chance his Stormblades could break. Also, it was long enough ago that I don’t remember exactly what was in his army. With the deployment advantage of the Vindictus tier 4 and going second, I definitely had positional advantage. A well timed feat from Vindictus is a back-breaker against certain lists. I really liked this table, but I didn't play on it again. I felt like it might have been a bit too unfair for my list. I was gunning for points and this was the only Tier list I had which was fully painted. If I can remember any of the details for the other large handful of Vindictus games I played, expect to see more.

I really enjoy his tier list. Thanks for reading.

Thursday, March 20, 2014

Warmachine Battle Report: Feora, Protector of the Flame vs Durgen Madhammer

Recently I played a pair of games in anticipation of the arrival of Tristan Durant and the upcoming tournament at PAX East. My first game (the battle report is here) was against Cygnar, my second game was against Mercs - specifically Durgen.


Here are the lists:


Feora, Protector of the Flame - Protectorate Epic Warcaster
- Templar (bonded)
- Vanquisher
Initiate Tristan Durant (played by the esteemed Dartan Vilmon)
Redeemer
Vassal of Menoth
Saxon Orrick
The Covenant of Menoth
Choir of Menoth (min)
Temple Flameguard + UA (max)


Specialists:
Visgoth Juvian Rhovan & Honor Guard
Eiryss, Angel of Retribution
Wrack
Gorman Di Wulfe


Durgen Madhammer – Rhulic Mercenary Warcaster
- Wraughthammer Rockram
- Basher
MacNaile (the Doogs)
Rhupert Carvolo
Reinholdt
Thor Steinhammer
pAlexia
Nyss Hunters
Tactical Arcanist Corp


Specialists:
Aiyana and Holt
Taryn
Anastasia
Gorman


The scenario was Supply and Demand (the ammo dump). Menoth swapped the Vassal for Gorman, Mercs made no substitutions. Menoth won initiative and elected to go first.


DEPLOYMENT:


Menoth was eying a convenient linear obstacle near the zone and therefore parked the Vanquisher and Feora on the left. Tristan took up the right flank, with the Redeemer eyeing another piece of terrain. The TFG planned on moving right up the middle with the Templar backing them up. The Mercs deployed in a brick with the TAC on their left flank. No one was interested in the forest.


TURN 1: MENOTH


The Redeemer gets Fortify and runs for the linear obstacle. The Vanquisher moves up. Feora casts escort and puts ignite on the TFG. She moves up. Gorman advances and puts up a cloud. The TFG shield wall and advance six inches. Everything else tucks in behind.


TURN 1: MERCS (not pictured)


Everything advances. Durgen attempts to drift some deviations … lots of deviations but nothing sticks. The TAC drop clouds. The Basher heads for the center of the field. The Nyss Hunters get Primed which is a sick and evil thing to do. Rhupert makes them Fearless and they all spread out nicely. Alexia holds up the rear.


TURN 2: MENOTH


The Redeemer gets a full load from Tristan. Feora upkeeps two spells, gives one to each Jack and camps a few. The Choir battles the Jacks. The Redeemer attempts to drop some shots into the Nyss, cleans out a few, but doesn’t accomplish much. The TFG mini-feat and run to get some sort of jam going on those Nyss. Menoth makes a mistake by accidentally engaging one (while they are Fearless). The Templar runs up behind the TFG and toes into the zone.


TURN 2: MERCS


Mercs activates the Nyss before Alexia or Rhupert. If they had not been engaged they would have had to pass a terror check when they started run/charging past the TFG front line. Menoth weighs some options, decides to attempt the lethal free strikes. Some hit (exploding the Nyss and the TFG), some don’t (letting the WM charges land). One of the Nyss runs to engage the Redeemer. Many TFG are killed. The Basher attempts a slam but fails. There are some explosive shenanigans and move TFG die as well as a Nyss. The exploding Nyss boxcars damage on the Basher dealing 7! Durgen and his friends demolish the Objective for a point. The TAC hide Durgen again. Alexia makes a Thrall … it advances and kills a TFG.


SCORE: MENOTH 0, MERCS 1


TURN 3: MENOTH


The Templar gets three focus, the Redeemer gets two focus. Tristan upkeeps Fortify and camps 1 (to boost later on). Feora drops Ignite, upkeeps Escort, and gives one to the Vanquisher (for boosting damage), camping 1. The Choir advance and battle the Jacks. The Templar beats the Basher into the ground and takes out another Nyss (and a TFG from the exploding Nyss). The TFG declare a shield wall and fail to kill anything. Saxon advances and murders … something important? The Nyss leader, perhaps? Alexia is finally starting to get corpses. Tristan activates, advances and drops the Nyss jamming the Redeemer. The Nyss explodes … and against an armor 19 Redeemer, manages to hit it for 7 … in the 1. There goes the Rocket. Craaaaaap. The Redeemer aims and tries to take out a few Risen … poorly. The Vanquisher tries to drift a shot into Durgen, but fails. If the Templar can withstand the next round, things will turn around. If not, the Vanquisher can finish the piece trade and things will still turn around. Gorman advances and tries to obscure Feora with a cloud, aware that a Nyss hunter is out there on the loose. Feora tucks in near the Vanquisher to keep her armor high.


SCORE: MENOTH 0, MERCS 1


TURN 3: MERCS (not pictured … it’s getting late)


The Rockram gets three focus. Durgen scratches the paint on the Templar for 2. The Rockram gets Redlined and charges the Templar and needs at least one roll to go above average on damage. The assault misses. The charge hits and deals below average damage. The first buy misses (hope!!), the second buy hits and does average damage, but takes out the shield (noooo), the third buy (Redline meant the charge was free) hits and the damage is absolute fire. Hits the Templar for 17 of its 17 remaining boxes. Le Sigh. It’s ok, Menoth can one round it with a Vanquisher … maybe. Then the Mercs go to work figuring out how to clear the zone. The Nyss run/charge and the two engaged TFG are murdered. The free Nyss runs around the zone to engage Saxon. Then the TAC activate. One advances centrally and pots the TFG standard bearer. One puts up a protective cloud near Durgen to block the attack vector from the Vanquisher, and one shoots the Nyss hunter in the back, which explodes killing Saxon and clearing the zone. Alexia and the Risen run into the zone and look around. Durgen has a toe in and so the Mercs dominate for two.


SCORE: MENOTH 0, MERCS 3


TURN 4: MENOTH


There are a number of lanes open to Menoth to get at Durgen, but none of them are awesome. The Redeemer gets a full load, the Vanquisher gets two. Feora upkeeps Escort and camps three. The Choir Battle the Jacks. The Redeemer sidles out from cover and draws a line on Durgen … but can’t hit because even with Boosting the RAT is crap. The shot goes sideways and the followup goes even more sideways. That’s ok, the Redeemer was a chance thing anyway. Next the Vanquisher attempts to out vector the cloud … and it does, but it comes up 11 inches away from Durgen. Rolls for deviation, and floats it onto the dwarf! Boost damage! *sad trombone* The Vanquisher only scratches him (poor damage roll on blast damage). But everything else is on fire. The Vanquisher uses the second focus to boost damage on the Doogs, killing him. Now its time for Feora to try to close it out. She advances into the zone and feats, bringing her up to 6 focus. She spends 1 to boost the hit and 1 to boost damage on her spray. She hits for a moderate amount. She casts her nuke, boost to hit and damage and … Rolls a five. Durgen is left at 5. (These damage rolls were so very very sad). But he is on fire and cranking the fire damage roll might do it. The Book advances to contest, Gorman advances to contest and cloud? Menoth passes turn and warms up the fire dice.


SCORE: MENOTH 0, MERCS 3


TURN 4: MERCS:


Menoth rolls a seven on the fire damage, dealing two points of damage bringing Durgen to 3. Gorman is murdered, the Book is murdered. Mercs dominate the zone and win on scenario.


SCORE: MENOTH 0, MERCS 5


VICTORY FOR THE MERCS!


It was a fun game. My opponent suggested that I should play Feora more aggressively, and he is correct. I am not used to having a caster who doesn’t die instantly if they get hit. It turns out that keeping a cloud around and Escort up means that Feora is kinda difficult to hit and difficult to damage. Plus if you get near her, that’s when the party starts. The fire party. Overall I like this list enough to play it several more times as is. I think I need to start playing Tristan and the Redeemer more centrally. I did not give myself enough targets with the Redeemer. Primed Nyss Hunters are freaking evil…just...evil. I felt like I was handling the heavy piece trade well, but I shorted myself on pieces to contest the zone and fell behind. I need to get fire on my opponent’s caster sooner and overall I need to be slightly more aggressive without just walking into my opponent’s charge range.


Thanks for reading!


About Me

My photo
Geek - Gamer - Librarian - Writer. Only awesome at one of those things at a time, unfortunately.

About Fading Interest

After writing op-eds and travelogues for several years, after finishing a few books, and after failing to get the ball rolling with project after project I stumbled into an idea that might just hold my interest long enough to enjoy some level of satisfaction with my writing.